Mar 07, 2024
 778
778
Note:
This article showcases features that are typically only made available to Administrator roles.
However, since Getac Enterprise is highly configurable, the ability to complete tasks described in this article may be different for each User, depending on policy. Please contact an administrator with all access questions and concerns.
However, since Getac Enterprise is highly configurable, the ability to complete tasks described in this article may be different for each User, depending on policy. Please contact an administrator with all access questions and concerns.
Overview
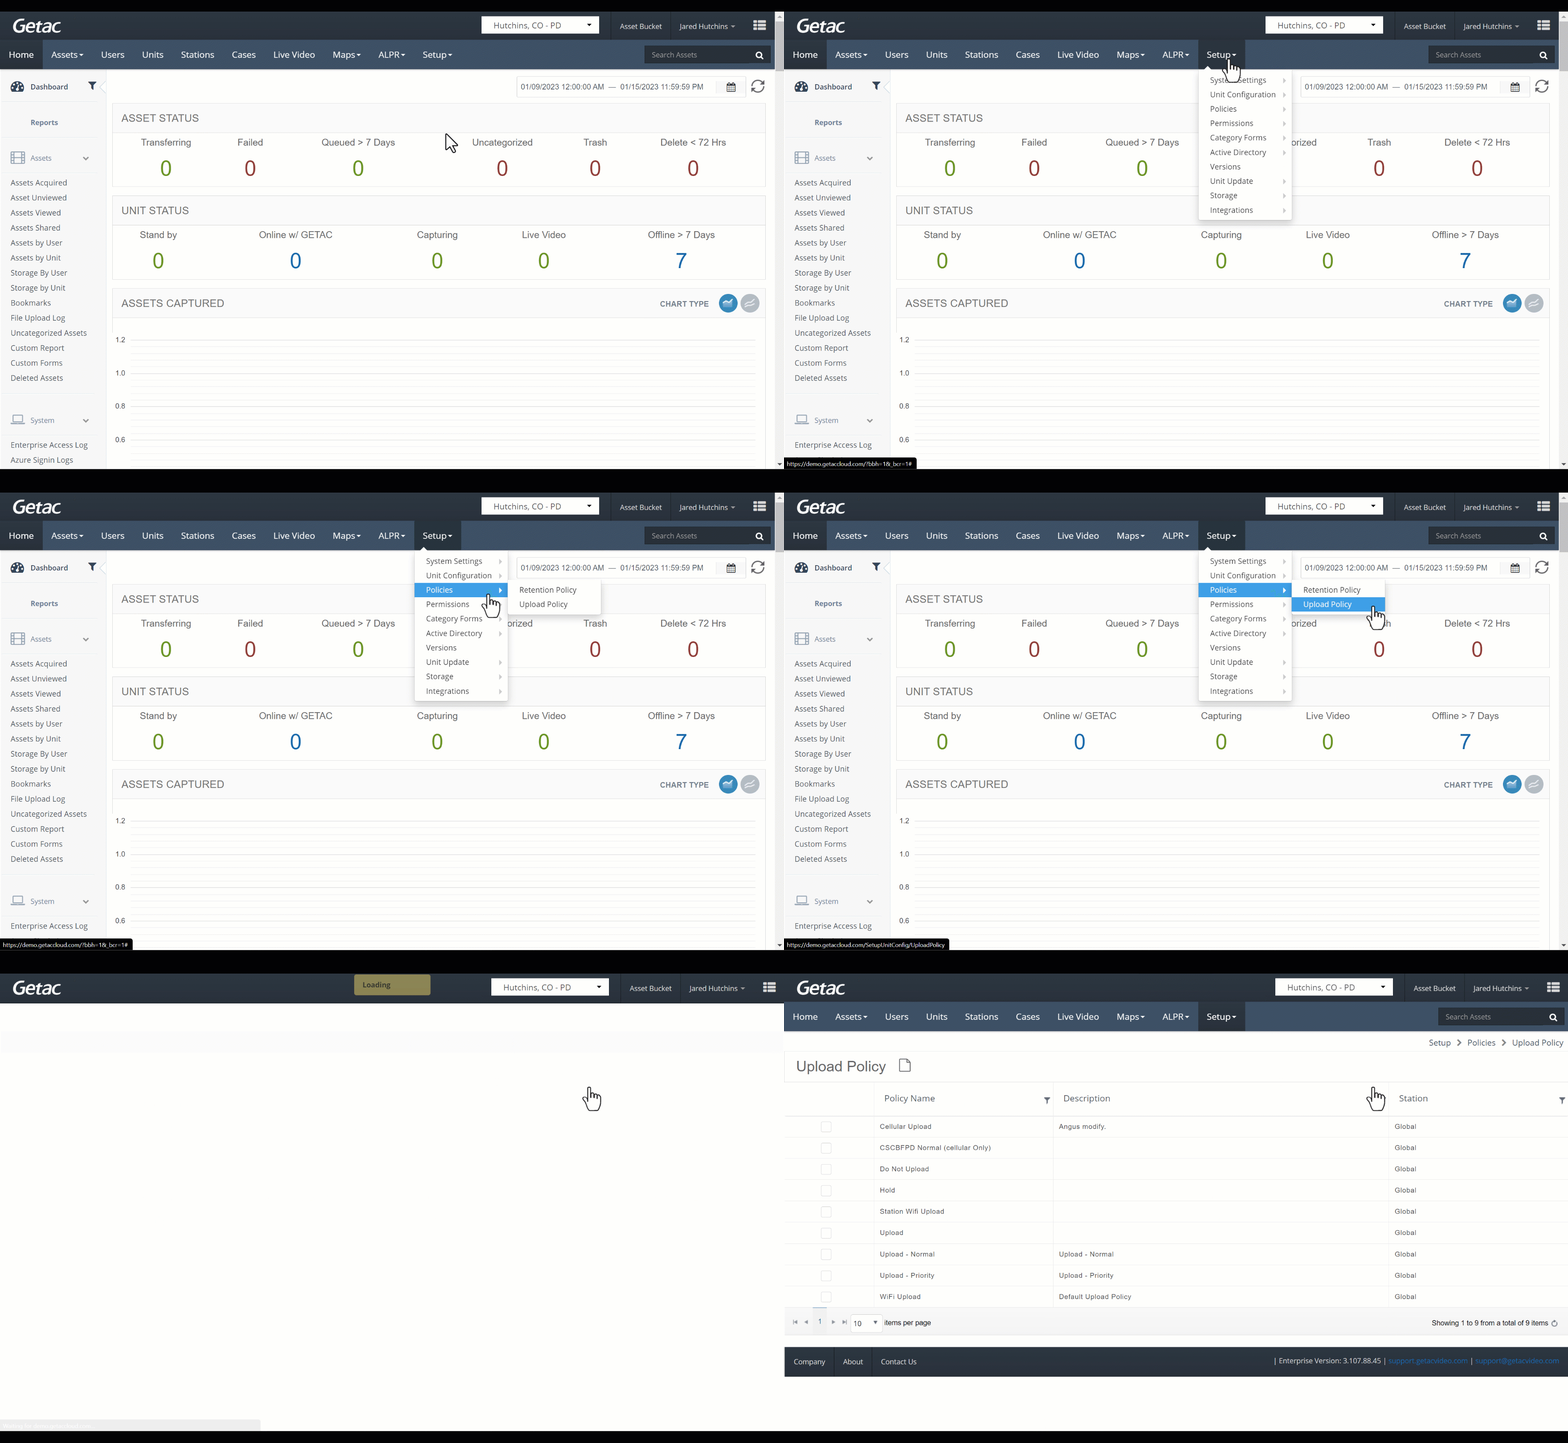
Upload policies define which data is uploaded to the server and by which means, e.g. connection type. This feature is extensive and unique to each customer deployment. Each policy supports separate rules for different asset types.
See the image below for how to access the Upload Policy page:

Add or modify an existing policy
Perform the following steps:
- Click on the Page icon or select a template from the list, then click on the Wrench icon.

- From the Upload Policy Details page, provide the following:
- Name - Policy name.
- Station - Select which Station to apply to our select global to apply it to all Stations.
- Description - Optional. Describe the upload policy.
- Click on Page icon to add the following:
- Type
- All: Any asset file of any type.
- Audio: .WAV, .M4A, .MP3, .WMA, and .OGG files.
- Excel: .XLS and .XLSX files.
- GPS: Latitude & Longitude Metadata.
- Image: .JPG, .PNG, .GIF, .TIF*, and .BMP.
- Other: .CSV, .RAR, Rich Text, and other general file formats.
- PDF: .PDF Document
- PowerPoint: .PPT and .PPTX files.
- Text: .txt files.
- Video: .MOV, .AVI, .FLV, and .MP4
- .WMV: Microsoft Video .WMV format files.
- Word: .DOC and .DOCX files
- Zip: .ZIP file archives.
*Note:Not all .TIF file formats are supported
- Type
- Upload
- True - Will upload content that matches the criteria.
- False - Will notupload content that matches the criteria.
- Metadata Upload Connection - Select/Manage which connection(s) can be used for uploading the Metadatafor the criteria rule. Added connection(s) can be removed by clicking the X icon next to the connection.
- Available connections include:
- Cellular
- LAN
- Wi-Fi
- Station Wi-Fi
- Available connections include:
- Asset Upload Priority - Set which priority that Assets, which meet the selected criteria, will have when uploading compared to other Assets. Assetpriority will upload in the following order:
- High
- Above Normal
- Normal
- Below Normal
- Low
- Hold
Note:Priority is also processed at the server level using the same order.
- Asset Upload Connection - Select/Manage which connection(s) can be used for uploading Assets that meet that criteria. Added connection(s) can be removed by clicking the X icon next to the connection. Available connections include:
- Cellular
- LAN
- Wi-Fi
- Station Wi-Fi
- Click on Submit to finalize.
Delete existing policy
Perform the following steps:
- Select the desired template from the list by clicking on the checkbox to its left.
- Click on the Trashcan icon.
- Click on Ok to confirm
See image below for an example:

Warning:
If attempting to delete an Upload policy currently in use with an associated Category, the following error message will appear and prevent deletion:


