 998
998
However, since Getac Enterprise is highly configurable, the ability to complete tasks described in this article may be different for each User, depending on policy. Please contact an administrator with all access questions and concerns.
Overview
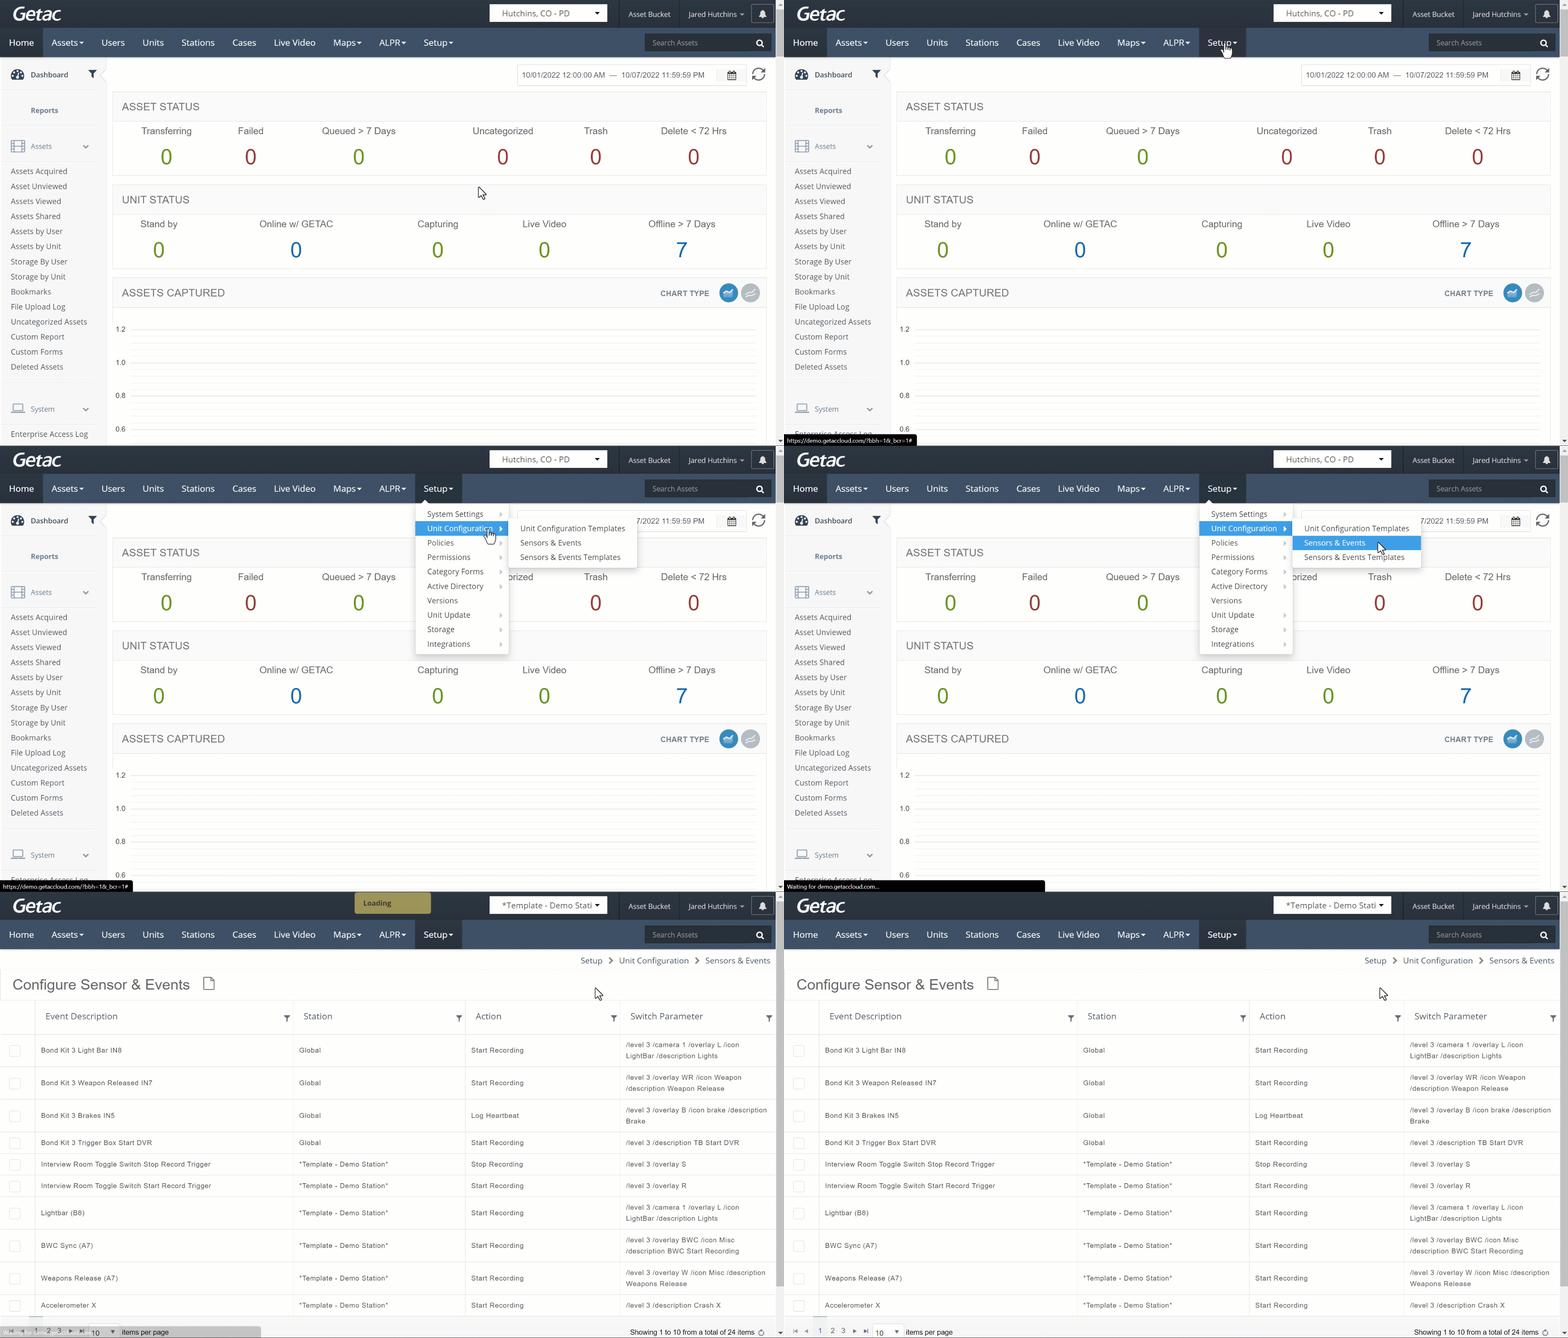
Getac DVRs are capable of sensing vehicular events and triggering specific actions such as video recording. All input and output events are manageable from Getac Enterprise and can be modified to support timing with complex rules. These are oftentimes referred to as triggers. Data associated with test events can be automatically discarded. To manage events associated with sensors, navigate to Setup > Unit Configuration > Sensors & Events.
The Sensors & Events page consists of the actual definition and instructions for each defined sensor. This includes enumerating the function or physical sensor port, labeling for overlays applied to the interface, text to be logged or emailed and tasks to be performed.
Typically, any 12v source can be utilized to create a Sensor & Event. Consult with a Getac Video Solutions Architect for more information.
See the image below for how to access the Sensors & Events page:

Common Sensors & Events include, but are not limited to, the following:
- Brakes - Log heartbeat.
- Light bar - Start Recording.
- Siren - Log heartbeat or Start Recording.
- Weapon Release - Log heartbeat or Start Recording.
- Crash Sensor - Start Recording*.
- BWC Sync - Start Recording with BWC.
- Speed Activation - This feature is part of the InCar Unit Configuration.
Add or Modify existing Sensor & Event
Perform the following steps:
- Click on the Page icon or select an existing Sensor & Event from the list and click on the Wrench icon.

- Click on the Page icon to add or modify any parameters on the Sensor & Event Details dialog.

- Select a device from the dropdown list, add/modify the Match Type and Value parameters, then click on Add or Save.

- Device Types include:
- Access USB-IIRO 4
- Advantech USB-4761
- Getac GPIO
- Getac NVR - VR-X10, VR-X20, VR-X20 F1.
- Getac Accelerometer
- Getac Gyro
- PcProx RFID Reader
- Phidgets Accelerometer
- Phidgets Digital
- Phidgets Interface Kit
- Red Alerts
- SM Bus GPIO
- Trigger Box
- Match Types include:
- Equals
- Greater than
- Less than
- Not equals
Note:Values are dependent upon which Device is selected. Contact [email protected] for assistance BEFORE modifying an existing sensor & event.
- Device Types include:
- Select a Station or choose Global to make the sensor & event available to all Station Groups.
- Choose an Action from the dropdown list:
- Beep - Activates an audible beep sound from the device.
- Bookmark Video - Adds a bookmark at the current timestamp when activity recording.
- Covert Mode - Automatically places the device in covert mode.
- Log Heartbeat - Logs the event and displays the event label as long as the event trigger signal persists.
- Login - Initiates device user log-in automatically.
- Mute Microphone - Places the associated microphone device in mute.
- One Time Focus - Initiates a zoom camera, automatic one-time focus operation.
- Open Front Door - Sends a signal to open the DVR front storage access door. Not applicable to the VR-X20 F1.
- Output Pin Trigger - Turn A5 or A6 output pins on if event parameters are met.
- Quickzoom - For legacy Getac zoom cameras; it initiates the quick zoom function.
- Shutdown - Start the system (device) shutdown (power off).
- Snapshot - Take an image snapshot at the current timestamp.
- Start Recording - Initiates Asset recording on the device.
- Stop Recording - Sends a command to end any active recording.
- Switch Camera - Changes the currently viewed camera screen on DVR-based systems.
- Toggle Recording - When the sensor is used, this will toggle the record mode, e.g. 1st use, start recording; 2nd use, stop recording.
- Toggle Recording & Login - Similar to Toggle recording, however, this feature is typically tied in with RFID tags, e.g. 1st RFID scan, log in assigned User, and start recording. 2nd RFID scan, sign user out and stop recording.
- Unmute Microphone - Allow microphone to capture audio.
- Type a Switch Parameter:
- /level - A numerical value for reference (analytics/tracking) between 1 – 5. 1 appears Blue, all others appear Red.
- /overlay - The Label (abbreviation) that will show on the metadata overlay when the event is active. The accepted value is Alpha-numeric (not limited).
- /icon - The visible icon picture that will appear for the event on the sensors page of the InCar application.
- /description - The name/label as it will appear on the sensors page of the InCar application. The accepted value is Alpha-numeric (not limited).
- /classify - Applies for the accelerometer. Used to auto-assign a Category for crash events. A single Category Name.
- /email - Applies for the accelerometer. Used to notify via email of a crash event. Valid email address.
- The following is a list of available sensor event icons that can be used and their corresponding switch parameter:

Ex. Sensor Event Icons - Click on Create or Save to finalize.


